
In today’s How-To we want to show you how to track your newsletter subscribers from Mailchimp with the VINIS App. If your goal is to build an online business, you might be interested in offering a newsletter to your visitors and thus building an email list. To keep track of the number of your subscribers at all times and to receive a notification when there are new subscriptions, you can create a corresponding key figure for your goal.
Mailchimp
Mailchimp is one of the most widely used platforms for email marketing. It is a cloud-based service that allows you to build a newsletter in a short time. There is no need to install it on your own server, you can do the setup completely through the web interface. The service can be tested for free. For smaller email lists (up to 2000 contacts) the free version is sufficient. Mailchimp offers an API that can be used to retrieve certain information such as the number of members of a particular email list. We will use this for the following step by step guide.
Step by step guide
1. Create a Mailchimp API Key
In order to access data via the API, an API Key is required. This can be created with a few clicks via the Mailchimp web interface. Log in to your Mailchimp account and navigate to your account settings. You can get there by clicking on your account name in the upper right area of the navigation bar and then on Account. Now you will find “Extras” in the submenu. Open the popup and click on “API keys“. Now you can create the API key by clicking on “Create A Key“. You can find it in the column “API key“. Copy it into a text document, because we will need it later.
2. Copy Audience ID
Next, we need the Audience ID of your email list that you would like to track. To do this, go to “Audience” in the Mailchimp main menu and select “All contacts“. Now open the “Settings” popup in the submenu and click on “Audience name and defaults“. In the right pane you will find the Audience ID (e.g. e5da126478). Copy this into your text document as well.
3. Create URL
Finally, we need to assemble the URL that we can use to load the desired data. The URL template looks like this:
https://{data_center}.api.mailchimp.com/3.0/lists/{audience_id}/members?count=1&fields=total_items
In the URL, we still need to replace the two placeholders:
{data_center} => you can find the DataCenter in the URL of the Mailchimp web interface. We need the first part before “admin.mailchimp.com”. (e.g. us10)
{audience_id} => here you enter the already copied Audience ID. (e.g. e5da126478)
The final URL would look like this:
https://us10.api.mailchimp.com/3.0/lists/e5da126478/members?count=1&fields=total_items
4. Configuration of the key figure in the VINIS App
Now we have all the information to be able to create the key figure in the VINIS App. To do this, we create a new key figure for our goal and configure it as shown in the following graphic:
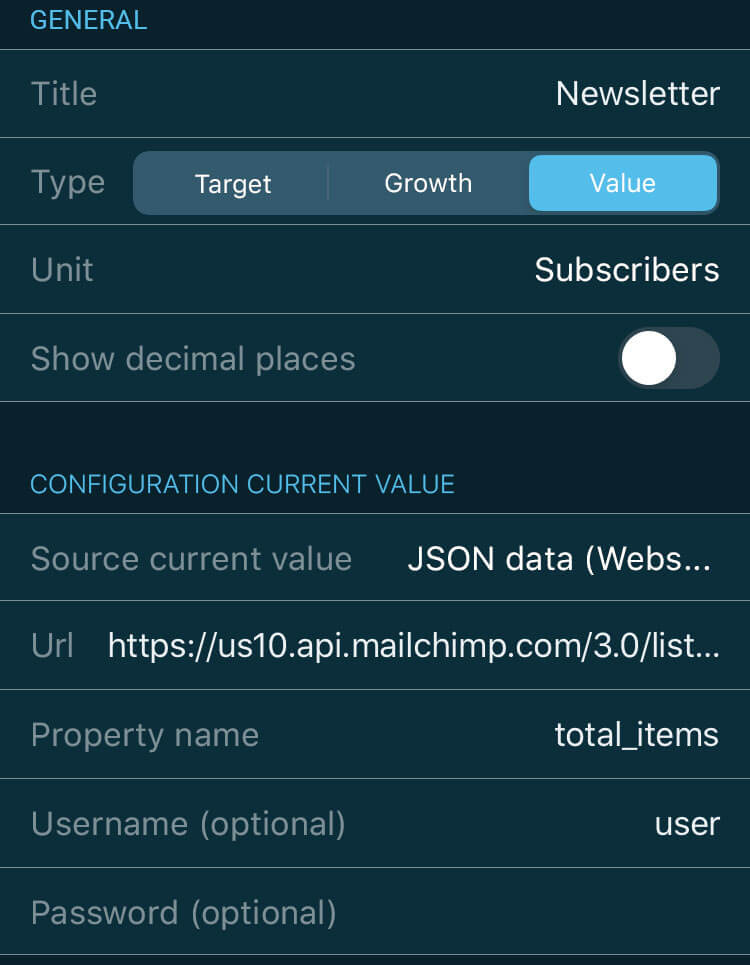
Title: Give your key figure any title (e.g. Newsletter).
Type: We want to represent the number of subscribers as a concrete value (Value)
Unit: We enter “subscribers” as the unit.
Show decimal places: We disable the decimal places
Source current value: We load “Json data” via a web service
Url: Here we enter the already created url
Property name: “total_items” is the property name where the desired value is located
Username: Is not needed. Here can be any text, e.g. “user”.
Password: Your API key is used here.
The configuration is complete. The app will now keep you up to date and inform you regularly about new newsletter signups. You will receive a notification with the new number and in the app you can track the progress of the signups in detail. Get started now and get the VINIS App.